|
|
|
As I
told my students, my role in the course is a helper who can help you do a
better job in the course. With your involvement, conscientious, and
efforts, I would assure you your success in this course is expected. This
orientation is designed for Sonny’s online courses. Becoming familiar with the course’
procedures, system and requirements will improve your performance and
experience with me. Please pay attention to the information provided. It
is also required to review course’s syllabus and other materials, which are
posted in Canvas website, (Canvas.losrios.edu.) The Canvas site is an official Los Rios eLearning
web site. I will show
you how to access the web and get to the information. |

|
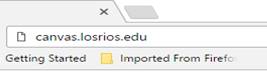
The
web address for the Canvas web site is canvas.losrios.edu. The address is
case insensitive. Students of the
course should be able to access the course content by using your student id
number and a password through this website after the starting day of the
class. The following is the
instruction to the web site. |
|
|
1. connect to the
internet |
You need to make sure
your computer is internet ready and the connection to the internet service
provider (ISP) is hot. Launch a
browser(Internet Explorer, Google
Chrome, Mozilla Firefox, or others) |
|
2. Type “canvas.losrios.edu”
in the address area (AUL, address universal locator) and hit enter key. |
|
|
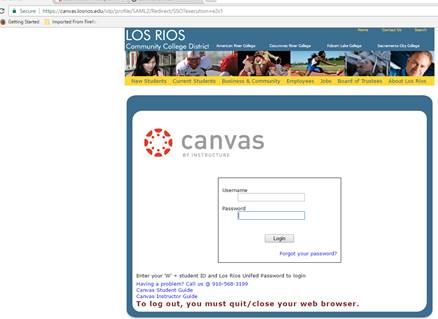
3.
You should see the canvas, Los Rios eLearning, web site comes up. You can use
this page to provide username and password to log in to the canvas website. |
|
|
4. The lower portion of the page also provides
some useful information if you have any question to login. |
|
|
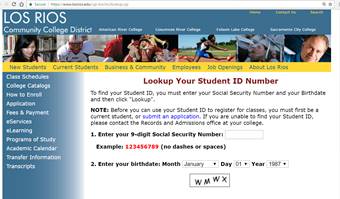
5. If you don’t have
your student ID handy you can go to https://www.losrios.edu/cgi-bin/lrc/lookup.cgi
to find out. |
|
|
6. When you login to
the Canvas site, you should see a Dashboard page with your registered courses
list. |
|
|
Other
resources: Canvas
Student Guide: https://community.canvaslms.com/docs/DOC-4121 Search
the canvas guide: https://community.canvaslms.com/community/answers/guides/ Please review each
individual topic to understand more about the canvas system |
|


|
The following section explains some of the common
menu items in my courses: |
|||||
|
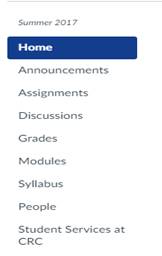
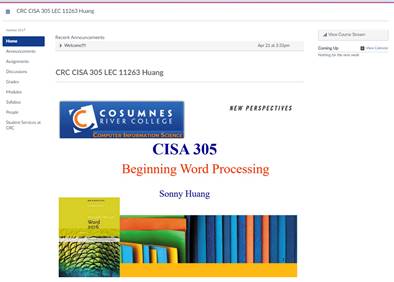
1.
When you enter into any one of my courses you should see a very similar
screen like the picture on the right. |
Common Course Navigation Menu Course information |
||||
|
2. The right side picture is the common
course navigation menu items. When you click on any of the items, it will lead you to a particular area. The
blue background and white letters navigation menu item indicates that the
item is displayed in right pane of the screen. |
|
||||
|
3. If
you click on the “Home” menu item, you should see the first page of the course. In this page you can see some recent announcements,
coming up events, calendar link etc. |
|
||||
|
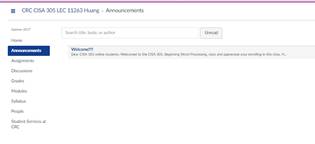
4. Click on the “Announcements” menu item, the
computer will lead you to announcements page. In this
page you can see the recently posted announcements. |
|
||||
|
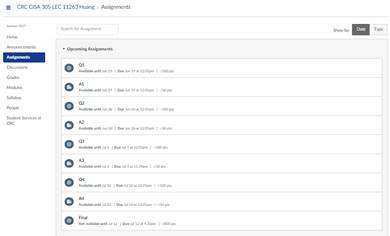
5. Click on the “Assignments” menu item you will be leaded to assignments page. You can sort the assignments by
date or by type. The figure on the
right is sorted by date. You can do quizzes or submit your assignments by
click into each Q or A link. |
|
||||
|
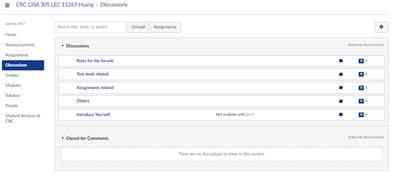
6. When you click on the “Discussions” menu item, it will lead you to the Discussion page. You can post questions and provide answers at
here for other students. |
|
||||
|
7. Click on the “Grades” menu item, you will go to the Grades page. The class scores is listed in this page. |
|
||||
|
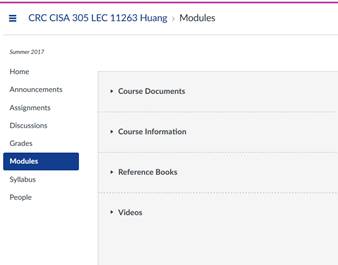
8. If
you click on the “Modules” menu item you
should see course
Documents, video, Reference Books and etc. items. If you expend the Course Documents you can
see and download PowerPoint slides for the class. If you expend the Video you can see video
links. If you expand the Reference
Books you can see some reference books. |
|
||||
|
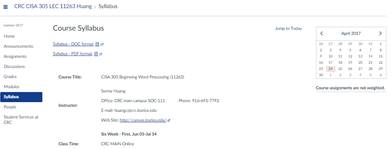
9. Click on the “Syllabus” menu item that will lead
you to the syllabus page of the class.
In this page you can download the class syllabus in doc or pdf
format. |
|
||||
|
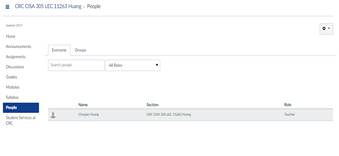
10. Click on the
People menu item you will see all the participants of the class. |
|
||||


|
If we all follow the same guidelines, the
communication efficiency will be improved. |
|
1.
Identify yourself by using your name, student id, return address, and course
number. Put the course number and purpose at the subject line.
Place your name and return e-mail address at the beginning of the
message. If you have a file to attach, please don’t forget to attach to
the file . |
|
2. If you send me a question, be sure to
include the word "question" in the subject heading for a quick
response. |
|
3. The email
is a way of communication that lack of facial, voice and body gesture to convey
the message. The message distortion
could be great. The same message can
be interpreted into different purposes.
So, be careful on the term, caption, punctuation and etc. We should put more please, thank you, and
you are welcomed type of terms in email to smooth the communication. |

|
|
|
|
|
|

|
In this section you will learn “print screen”, paste
the screen image to a word document, and save a word document. |
|
|
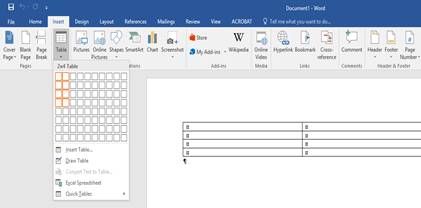
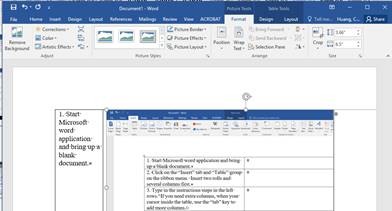
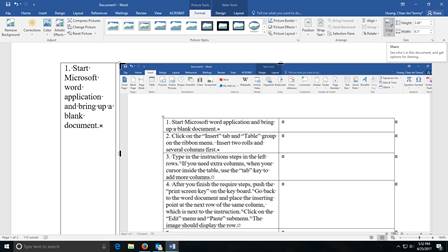
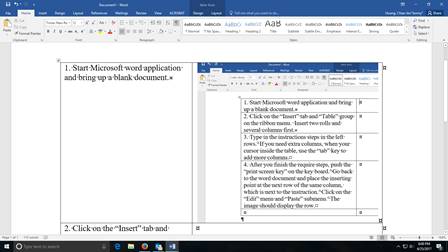
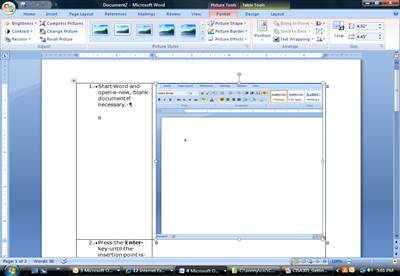
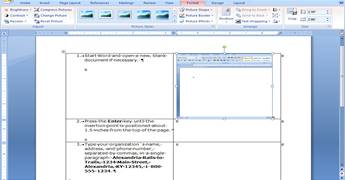
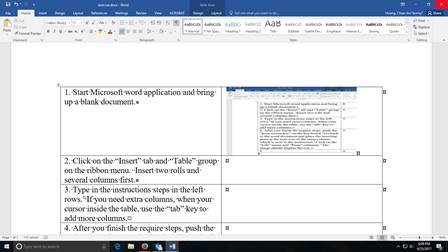
1. Start Microsoft word application and bring up a blank document. |
|
|
2. Click on the “Insert” tab and “Table” group on the ribbon menu. Insert two rolls and several columns first. |
|
|
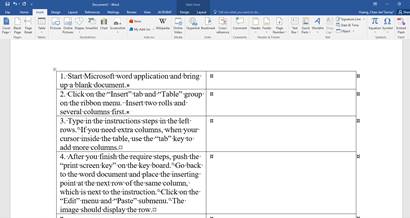
3. Type in the instructions steps in the left rows.
If you need extra columns, when your cursor inside the table, use the “tab”
key to add more columns. |
|
|
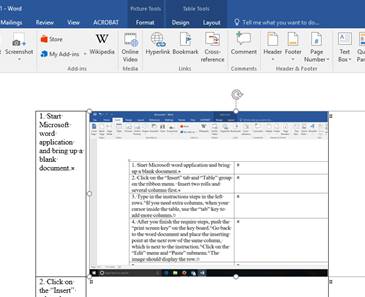
4. After you finish the require steps, push the
“print screen key” on the key board. Go back to the word document and
place the inserting point at the next row of the same column, which is next
to the instruction. Click on the “Edit” menu and “Paste” submenu.
The image should be displayed in the row. |
|
|
5. You can
adjust the image by cropping or dragging the picture. Cropping is cutting out an image where you do not
need it. Dragging can minimize or enlarge the picture. |
|
|
6. Double
click on the picture; you should see the picture tool at the title bar
area. |
|
|
7. Select the picture tools format tab, in the Size
group, you should see the crop menu. |
|
|
8. If we want to cut some area of the picture off
please follow from step 8 to 10. Click
on the crop and you should see the black short line at the edge of the
picture. |
|
|
9. You can move your mouse to the short dash line
and hold down on the line and move in toward to the center direction of the
picture to cut the unwanted area. |
|
|
10. Click outside of the picture area to unselect
the cropping function. |
|
|
11 If you want to size the picture please follow
from step 11 to 13. Click on the
picture and you should see small circles around the edge of the picture. |
|
|
12. Move your
mouse on the circle and hold on the circle.
Drag the circle toward to the center direction to minimize the size of
the picture or again the center direction to enlarge the picture. |
|
|
13. Click
outside of the picture area to unselect the sizing function. |
|
|
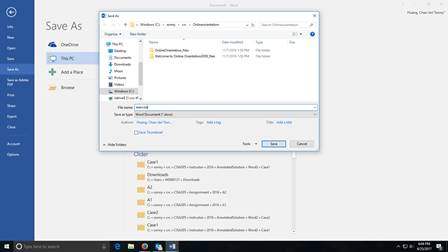
14. To save
the file by clicking the office button, save as menu. The save as dialog box
shows. Choose a location and word
document. Provide a file name such as “exercise” in the picture. |
|


At this point, you should feel very comfortable to login to the Canvas and access this class information. If you have any question on accessing the web site you can contact me at huangc@crc.losrios.edu.
The syllabus will give you more detail about this class. Read through the syllabus first, before you start your journey in this class.
I usually use the Canvas to send out information or contact you. So, please update your Canvas email address.
Thanks again to choose my course and have fun..